You can call me spoiled all you want, but when you work 7 days a week, on call not knowing when someone will demand you pick up from what you are doing and head in to work... you can point the finger and call me a brat- but I know you wouldn't- because like me, you work for what you got.
At any rate, yes, guilty as charged... I have myself a changing room. Showing this particular room to friends and family usually ends up being the same result- they are in awe- they wish they had it- and they compliment on the... yep... the freakin racks.
In my case, I went with the ClosetMaid ShelfTrack 5-8 foot Closet Organizer Kit. Below you will find my review of this particular organizer. -Review also found on Yahoo Contributor- reviewed by me.
Before the review though, have a gander at my precious!
My cousin is up there helping me get all of my clothes on hangers, and next to that photograph is the finished product.
Anyhow... on to the review:
Ever since becoming a homeowner, and having more than enough rooms than I
knew what to do with, I decided to turn one of the con-joining rooms
that attaches to my bedroom into a dream walk in closet that every girl
could ever want, or need as far as space was concerned. However I did
not want to cluster up the room with dressers and bulky furniture
pieces. I wanted organization. I wanted to feel as if I was walking into
my own perfect little boutique, and everyday when I went in to change
for work, I would not feel as if I were just in a room, but a shopping
store.
ClosetMaid ShelfTrack 5-8 foot Closet Organizer Kit literally
delivered exactly what I was looking for. This review is dedicated
entirely to the ClosetMaid ShelfTrack 5-8 foot Closet Organizer Kit.
I picked up this kit for $139.00 at Home Depot. I felt the price was
sort of high for a bunch of metal pieces, but after putting it up and
lining it with my clothes I realized it was money well spent.
The first items I purchased were free standing clothing racks, and I
found out very quickly how useless they were, and how easily they fell
apart. ClosetMaid ShelfTrack 5-8 foot Closet Organizer Kit is built into
the wall, so there are no weak spots, and you can hand a lot and not
have to worry about the weight.
Set up was a real headache, as you can extend the unit to fit anywhere
from a 5 foot sized wall, to an 8 foot sized wall. I of course extended
it to the entire 8 feet allowing me some more room.
As I said though, setting it up was not easy because the directions
are very vague and very hard to understand. We literally did everything
by eye, so once we tossed the instructions and rigged it up our own way
things came together a lot easier. Do be sure though to have your units
hang rack nailed or drilled into at least 2 wall beams in order to
support the weight of the unit.
All in all installing the ClosetMaid ShelfTrack 5-8 foot Closet
Organizer Kit took about 4 hours, with the help of 2 other people. Once
it is installed you are free to place your shelving anywhere you see
fit, there is no one way, set way to go about things. You can place them
where you want, and I truly loved being able to customize the unit to
fit my needs.
Once the ClosetMaid ShelfTrack 5-8 foot Closet Organizer Kit was all
set up, I went ahead and began placing my clothes on hangers and putting
them on the hang bars. I worried about the weight of my clothes pulling
it out of the wall, but the issue never arose.
I was able to hang everything I owned, including shoe boxes with shoes
inside of them without the unit even showing signs of fragility. I
still have room to add more things too, and not just a little room, a
whole lot of it.
Overall:
The ClosetMaid ShelfTrack 5-8 foot Closet Organizer Kit is a sturdy
and fabulous piece. I now walk into my changing room and feel as if I am
in a boutique and not some cramped up closet. I am in love with it, and
will be purchasing the smaller 3-5 foot unit for the other wall.
I cannot recommend this organizer enough. I no longer have a hard time
finding what I need, nor do I have issues finding matching pieces. This
has literally saved me time in the morning instead of rummaging through
dresser draw making messes.
Thursday, October 24, 2013
Hey We Need a Freakin Sensor Light Out Here!
The very first thing I noticed about the house when we moved in, was that at night there was no motion sensor lights attached to the exterior of the house.
This annoyed me to no end, because I felt that it was something we needed immediatley. The only issue was, I had no clue how to install an electrical one.
So here is my review of the one I decided to buy, the XEPA PSO1W Solar Motion LED Spot Light
-My review can also be found on YAHOO CONTRIBUTOR NETWORK.
Did you know you could save yourself a bunch of money if you were to purchase the XEPA PSO1W Solar Motion LED Spot Light sold by Coleman instead? It is in fact the very same light. Just some food for thought.
I stumbled upon this by simply searching online for the model number PSO1W. At any rate, I discovered this normally priced $100.00 solar motion activated light for half the cost. I got lucky, unintentionally of course, because I was about to spend $100.00 on the light anyway, however after discovering the light for $50.00, I naturally was happier than a pig in mud.
Anyway, moving along, one hundered dollars, or fifty dollars, is the XEPA PSO1W Solar Motion LED Spot Light even worth the price? That is after all why you stopped in, is it not?
So let me break down exactly how I feel about this solar motion activated flood light.
On arrival I laughed pretty hard at its overall appearance. It seriously looked like a cartoon robot from Futurama. It appears to have 2 eyes, a mid section for a nose, and the motion activator looks like a mouth. All strangeness aside though, my next thoughts were of quality.
The XEPA PSO1W Solar Motion LED Spot Light is made of plastic, but not a cheap flimsy sort of plastic, a very sturdy and heavy duty plastic which made me feel as if this light was made well, and it would indeed withstand the harsh elements of being outdoors. You can purchase this light in either a black finish, or white. I went with the white finish to match my homes white siding, as my plan was to affix it to the side of the house.
My reasoning was simple; we bought a home that did not have a motion activated flood light, and being the non-handy broad I am, I had no choice but for a quick and easy fix. I also had no idea how to wire in a flood light, nor did I have the time to. This light made that issue disappear, as nothing is required in order to get it to work. Nothing but the sun that is.
In the box a large, and yes, a slightly ugly black solar panel which feeds the light energy. I am not a technical person, but basically the included panel is what catches your rays energy and seeps them into the light in order for it to charge up everyday and provide light at night.
Installing the XEPA PSO1W Solar Motion LED Spot Light was really simple. I crawled up onto my second story balcony, and screwed it into the side of the house. My only concern from there was whether or not this light would actually detect motion being so high up. I pointed the motion detector toward the ground and hoped for the best. I also wondered how powerful the 2 floodlights would actually be, considering most solar powered lights do not provide all too much light.
It took 2 days for the XEPA PSO1W Solar Motion LED Spot Light to fully charge and begin detecting movement. The box instructions stated it would take 3 days, but ours was fully functional in just 2.
I was giddy with delight when it powered on for the first time, and I was beyond impressed with just how bright the lights truly were.
Overall:
XEPA PSO1W Solar Motion LED Spot Light is a total win in my opinion. I did not have to hard wire anything into the electric, as everything is wireless. Installation took just minutes, and the light is exactly what we needed for at night when bringing in groceries, or when guests arrived, and of course to alert us when someone was in our yard at night. It gives me a sense of security, and I couldn't be happier with this purchase.
I highly suggest this one to those who like simplicity, ease of installation, and a maintenance free lifestyle.
The one con however which I must mention is that there is no way to set the length of time the light stays lit. It powers on for one minute, and will not power back on unless motion is detected again. No big deal, but I would have liked to control the length of time it remained on before auto powering off.
This annoyed me to no end, because I felt that it was something we needed immediatley. The only issue was, I had no clue how to install an electrical one.
So here is my review of the one I decided to buy, the XEPA PSO1W Solar Motion LED Spot Light
-My review can also be found on YAHOO CONTRIBUTOR NETWORK.
Did you know you could save yourself a bunch of money if you were to purchase the XEPA PSO1W Solar Motion LED Spot Light sold by Coleman instead? It is in fact the very same light. Just some food for thought.
I stumbled upon this by simply searching online for the model number PSO1W. At any rate, I discovered this normally priced $100.00 solar motion activated light for half the cost. I got lucky, unintentionally of course, because I was about to spend $100.00 on the light anyway, however after discovering the light for $50.00, I naturally was happier than a pig in mud.
Anyway, moving along, one hundered dollars, or fifty dollars, is the XEPA PSO1W Solar Motion LED Spot Light even worth the price? That is after all why you stopped in, is it not?
So let me break down exactly how I feel about this solar motion activated flood light.
On arrival I laughed pretty hard at its overall appearance. It seriously looked like a cartoon robot from Futurama. It appears to have 2 eyes, a mid section for a nose, and the motion activator looks like a mouth. All strangeness aside though, my next thoughts were of quality.
The XEPA PSO1W Solar Motion LED Spot Light is made of plastic, but not a cheap flimsy sort of plastic, a very sturdy and heavy duty plastic which made me feel as if this light was made well, and it would indeed withstand the harsh elements of being outdoors. You can purchase this light in either a black finish, or white. I went with the white finish to match my homes white siding, as my plan was to affix it to the side of the house.
My reasoning was simple; we bought a home that did not have a motion activated flood light, and being the non-handy broad I am, I had no choice but for a quick and easy fix. I also had no idea how to wire in a flood light, nor did I have the time to. This light made that issue disappear, as nothing is required in order to get it to work. Nothing but the sun that is.
In the box a large, and yes, a slightly ugly black solar panel which feeds the light energy. I am not a technical person, but basically the included panel is what catches your rays energy and seeps them into the light in order for it to charge up everyday and provide light at night.
Installing the XEPA PSO1W Solar Motion LED Spot Light was really simple. I crawled up onto my second story balcony, and screwed it into the side of the house. My only concern from there was whether or not this light would actually detect motion being so high up. I pointed the motion detector toward the ground and hoped for the best. I also wondered how powerful the 2 floodlights would actually be, considering most solar powered lights do not provide all too much light.
It took 2 days for the XEPA PSO1W Solar Motion LED Spot Light to fully charge and begin detecting movement. The box instructions stated it would take 3 days, but ours was fully functional in just 2.
I was giddy with delight when it powered on for the first time, and I was beyond impressed with just how bright the lights truly were.
Overall:
XEPA PSO1W Solar Motion LED Spot Light is a total win in my opinion. I did not have to hard wire anything into the electric, as everything is wireless. Installation took just minutes, and the light is exactly what we needed for at night when bringing in groceries, or when guests arrived, and of course to alert us when someone was in our yard at night. It gives me a sense of security, and I couldn't be happier with this purchase.
I highly suggest this one to those who like simplicity, ease of installation, and a maintenance free lifestyle.
The one con however which I must mention is that there is no way to set the length of time the light stays lit. It powers on for one minute, and will not power back on unless motion is detected again. No big deal, but I would have liked to control the length of time it remained on before auto powering off.
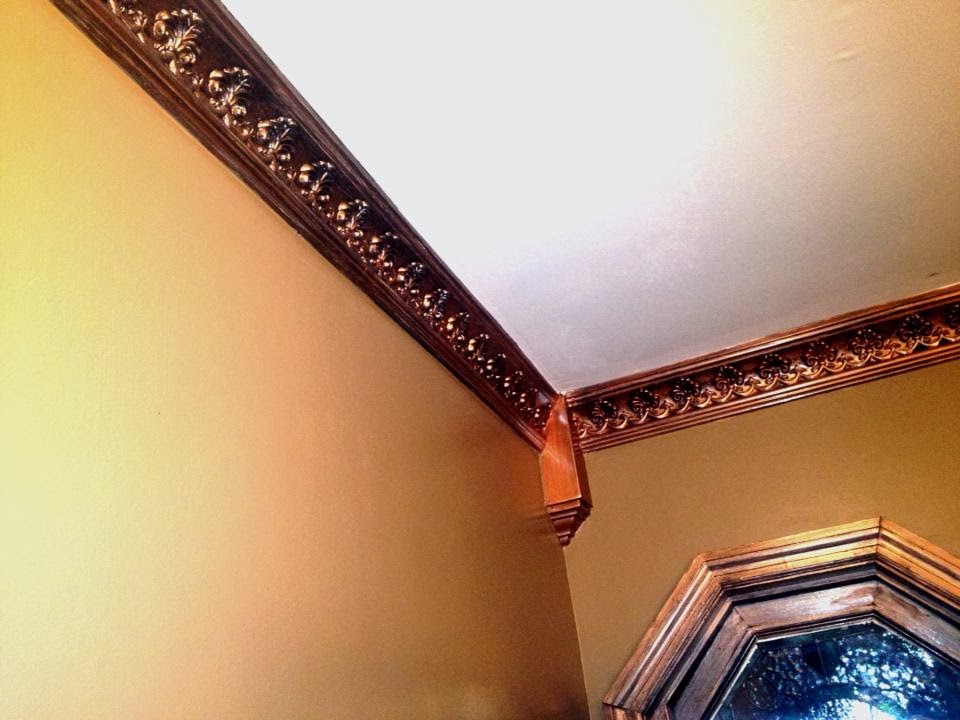
As Promised: How To Give Polyurethane Crown Moulding A Bronze Antique Paint Finish
My family is full of snobs, literally. If you are adding crown molding
to your home they say, than you absolutely must use wood.
Yeah in a perfect world where I hit the lottery and could afford to crown out every room in wood maybe I would. But after looking at pricing of wood molding, and polyurethane molding, I figured heck with them, I can not only save a ton of money, but I can also pick molding with truly beautiful and unique designs. Designs that I simply could not find carved into wood, let alone with prices I could afford.
After extensive research on exactly how to install this type of molding, I went ahead and took the plunge. I ordered 63 linear feet of poly crown molding, and hoped for the best. Heck for just $155.00, how could I go wrong?
The poly molding came shipped in a few days, and I had it cut and up in about an hour in my 33 linear foot bathroom. I also ordered corner blocks to virtually eliminate the need to do 45 degree miter cuts on the ends. Yes, I saved myself a ton of time!
Next was to paint them. According to the site where I ordered my poly molding, they were ready to be painted, so all I had to do was pick my colors.
Seeing that my walls were freshly painted brown, I figured a beautiful bronze antique paint job on my crown molding would really snap it to life.
Surprisingly the finish came out 100 times better than I had ever imagined it would, and here is how I did it.
You want to paint the molding after you install it, because any small cuts in the molding where one end meets the other will need Spackle in order to hide the seam. So, before painting, just install the molding. After it is up, allow it to dry and then add your Spackle to hide seams. Next you can paint!
Here is how to get a beautiful metallic looking antique bronze finish on polyurethane crown molding
I used black high gloss interior paint. I brushed it onto the molding in one quick swoop. This part of the paint job does not have to be perfect, but be sure to cover all white that may show through for a deeper coloring for when you apply your metallic top coat.
Anyhow, after painting the crown molding black, it will likely look awful. You will want to cry and wonder why you ever did it in the first place. Fear not, this is just part of the process, and it will give your molding depth, especially if you have any dips/grooves for a design in the molding.

You will want to allow this paint to dry. It does not take long for it to dry, but let it sit for at least 2 hours or so that way any areas that have paint pooled can dry better.
Next you need your metallic bronze overcoat. I used a beautiful and unique color called Penny Copper, which is sold in small containers by Martha Stewart.
I shook the container and began swiping this penny copper paint on top of the black. I was astonished when I finished at just how stunning the crown molding looked using this technique to paint it.
Basically in order to get this sort of deep rich shade of copper you will need to use a black base coat. The high gloss black paint allowed the color of the bronze to come out darker and more rich, hence only needing a small amount of metallic paint to bring it to life. Without using the black base color, the metallic paint would not have shown so brightly and vividly, and would have required tons of coats. When you use a black base you literally only need one thin coat of the metallic paint, saving you time and money!
Tip- You do not need to use a copper color, you can get a rich metallic silver, or any color you choose that is metallic to finish your molding. Just always remember to use a black undercoat to bring out the shine!
Have fun, and enjoy your new room!
Yeah in a perfect world where I hit the lottery and could afford to crown out every room in wood maybe I would. But after looking at pricing of wood molding, and polyurethane molding, I figured heck with them, I can not only save a ton of money, but I can also pick molding with truly beautiful and unique designs. Designs that I simply could not find carved into wood, let alone with prices I could afford.
After extensive research on exactly how to install this type of molding, I went ahead and took the plunge. I ordered 63 linear feet of poly crown molding, and hoped for the best. Heck for just $155.00, how could I go wrong?
The poly molding came shipped in a few days, and I had it cut and up in about an hour in my 33 linear foot bathroom. I also ordered corner blocks to virtually eliminate the need to do 45 degree miter cuts on the ends. Yes, I saved myself a ton of time!
Next was to paint them. According to the site where I ordered my poly molding, they were ready to be painted, so all I had to do was pick my colors.
Seeing that my walls were freshly painted brown, I figured a beautiful bronze antique paint job on my crown molding would really snap it to life.
Surprisingly the finish came out 100 times better than I had ever imagined it would, and here is how I did it.
You want to paint the molding after you install it, because any small cuts in the molding where one end meets the other will need Spackle in order to hide the seam. So, before painting, just install the molding. After it is up, allow it to dry and then add your Spackle to hide seams. Next you can paint!
Here is how to get a beautiful metallic looking antique bronze finish on polyurethane crown molding
I used black high gloss interior paint. I brushed it onto the molding in one quick swoop. This part of the paint job does not have to be perfect, but be sure to cover all white that may show through for a deeper coloring for when you apply your metallic top coat.
Anyhow, after painting the crown molding black, it will likely look awful. You will want to cry and wonder why you ever did it in the first place. Fear not, this is just part of the process, and it will give your molding depth, especially if you have any dips/grooves for a design in the molding.

You will want to allow this paint to dry. It does not take long for it to dry, but let it sit for at least 2 hours or so that way any areas that have paint pooled can dry better.
Next you need your metallic bronze overcoat. I used a beautiful and unique color called Penny Copper, which is sold in small containers by Martha Stewart.
I shook the container and began swiping this penny copper paint on top of the black. I was astonished when I finished at just how stunning the crown molding looked using this technique to paint it.
Basically in order to get this sort of deep rich shade of copper you will need to use a black base coat. The high gloss black paint allowed the color of the bronze to come out darker and more rich, hence only needing a small amount of metallic paint to bring it to life. Without using the black base color, the metallic paint would not have shown so brightly and vividly, and would have required tons of coats. When you use a black base you literally only need one thin coat of the metallic paint, saving you time and money!
Tip- You do not need to use a copper color, you can get a rich metallic silver, or any color you choose that is metallic to finish your molding. Just always remember to use a black undercoat to bring out the shine!
Have fun, and enjoy your new room!
Wednesday, October 23, 2013
What Happens When Your Lender Requires Mold Remediation In Order To Fund Your Loan?
This is coming from my own personal story; and let me tell you it has
caused 5 new white hairs to sprout from the very essence of my head.
Anyway, the reason for this article is based off of the simple fact that I could not find any information online in regards to what to do when a lender requires a certified mold certification.
In fact, I did not even know what it meant. So here is my experiences as a home buyer in this ordeal.
I found my dream house, everything looked fantastic. I had to order a home inspection, and after that an appraisal.
But, during a disgusting week long heat wave the house showed signs of secrets that were not seen until this heat wave spread through the county.
Low and behold, the basement decided to spore out like nothing I have seen before. Every wall down there was covered in mold. During the appraisal, of course the mold was noted.
Being a first time home buyer, I had no idea that this would hold up a sale and cost me so much grief. More so when I was under the impression that lenders are less likely to care about things when you are funding with a conventional loan, which was the type of loan we were getting.
Once the lender had the report in hand, and the mold was something of issue, they told us we needed mold certification. Basically a test that would show the type of mold, level, and so on.
This report cost $500!
Luckily for us, the seller paid for this report.
The report came back 4-5 days later, with a bunch of issues with mold. Count was high, moisture high, and so on. It all looked bad on paper.
With this being presented to the lender, instead of moving forward and allowing me to fix the issue myself after I moved in, I was told that in order to close the issue would need to need remediation.
Now here I am shaking in my shoes, already under contract, already financially vested in home inspections, and the cost of the appraisal. I am basically knee deep in this home, and of course there is a personal attachment to it as well. It's my dream home, and I certainly do not want mold to be the reason I cannot purchase it!
What are my options?
I can walk away. I can get back my deposit because the bank refuses a loan without it being remedied. I will however not see a refund on the home inspection cost and the appraisal cost.
I can ask the seller to fix the issue at bay so we can all move on and close the deal.
But what if the seller will not pay for the remediation?
You can still walk away, or you can negotiate a split between cost of remediation, however why should you pay for a remedy when the house is not yours yet?
There is risk involved in this sort of negotiation. However if you want that house, and you want to close on it, and the seller refuses to take the bill on as a whole, you may have no other option, which to me seems insane, but such is life.
What do you do?
First and foremost, you want to get quotes. Lots of them. Find out what the cost of remediation of the home will be. If it is a decent price, and you are willing to pay it, or split the cost with the seller than by all means, do so. However talk with your attorney first and see what they can do for you.
Costs can vary depending on the amount of remediation needed. If sheet rock is being pulled and the area being cleaned it will cost a little less, than say a project involving re-building.
Conclusion:
If you really want the house that badly move forward with the remediation process to appease the lender. If not, walk away, especially if the cost to remedy is very high and the seller is not willing to pay for it, or at minimum split the cost.
Anyway, the reason for this article is based off of the simple fact that I could not find any information online in regards to what to do when a lender requires a certified mold certification.
In fact, I did not even know what it meant. So here is my experiences as a home buyer in this ordeal.
I found my dream house, everything looked fantastic. I had to order a home inspection, and after that an appraisal.
But, during a disgusting week long heat wave the house showed signs of secrets that were not seen until this heat wave spread through the county.
Low and behold, the basement decided to spore out like nothing I have seen before. Every wall down there was covered in mold. During the appraisal, of course the mold was noted.
Being a first time home buyer, I had no idea that this would hold up a sale and cost me so much grief. More so when I was under the impression that lenders are less likely to care about things when you are funding with a conventional loan, which was the type of loan we were getting.
Once the lender had the report in hand, and the mold was something of issue, they told us we needed mold certification. Basically a test that would show the type of mold, level, and so on.
This report cost $500!
Luckily for us, the seller paid for this report.
The report came back 4-5 days later, with a bunch of issues with mold. Count was high, moisture high, and so on. It all looked bad on paper.
With this being presented to the lender, instead of moving forward and allowing me to fix the issue myself after I moved in, I was told that in order to close the issue would need to need remediation.
Now here I am shaking in my shoes, already under contract, already financially vested in home inspections, and the cost of the appraisal. I am basically knee deep in this home, and of course there is a personal attachment to it as well. It's my dream home, and I certainly do not want mold to be the reason I cannot purchase it!
What are my options?
I can walk away. I can get back my deposit because the bank refuses a loan without it being remedied. I will however not see a refund on the home inspection cost and the appraisal cost.
I can ask the seller to fix the issue at bay so we can all move on and close the deal.
But what if the seller will not pay for the remediation?
You can still walk away, or you can negotiate a split between cost of remediation, however why should you pay for a remedy when the house is not yours yet?
There is risk involved in this sort of negotiation. However if you want that house, and you want to close on it, and the seller refuses to take the bill on as a whole, you may have no other option, which to me seems insane, but such is life.
What do you do?
First and foremost, you want to get quotes. Lots of them. Find out what the cost of remediation of the home will be. If it is a decent price, and you are willing to pay it, or split the cost with the seller than by all means, do so. However talk with your attorney first and see what they can do for you.
Costs can vary depending on the amount of remediation needed. If sheet rock is being pulled and the area being cleaned it will cost a little less, than say a project involving re-building.
Conclusion:
If you really want the house that badly move forward with the remediation process to appease the lender. If not, walk away, especially if the cost to remedy is very high and the seller is not willing to pay for it, or at minimum split the cost.
Can Mold Noted On An Appraisal Hold Up Your Conventional Loan?
Everyone who gets a conventional loan is under the same impression that I
was when I was first approved for this more difficult to obtain loan. I
knew the nightmares associated with an FHA loan, and how strict they
are on their inspection process. I also knew an FHA loan would take a
heck of a lot longer to close on.
I jumped for joy when I learned that indeed my good credit score helped land me a conventional loan! Yippie! I sore in the air and click my heels together.
All was gouing well. I found my dream house, everything looked peachy; that is, until a rougue heat wave came into town causing the basement to literally spore out in mold without anyone's knowledge.
The appraiser was set to come out to appraise the home, and this was when the mold spores in the basement were discovered. There was no denying this was an issue, but I figured no big deal? I have me a conventional loan, all should be well, things go easier with a conventional loan right? I have nothing to worry about right?
Wrong!
Once the underwriter got the appraisal in hand and noticed that the appraiser had suggested that the mold be tested that was when my home buying process went from easy to plopping me into the stress test treadmill.
My lender passes the information on to me. This information is then passed on to the attorney. Who then passes it on to the sellers attorney, who then passes it on to the seller.
Thankfully the seller agrees to conduct this test.
Can you guess what happens next?
They find mold! Well duh! The mold thankfully is not the toxic kind, but due to the spore count it now needs remediation!
What the heck is that?
Oh, OK. You basically want me to hire someone to rip up sheet rock and spray chemicals onto the walls. I get it, but dang, how irritating because it was something we planned on doing anyway, after we closed on the loan.
Sadly, unless it is done, there will be no loan!
Now we must once again, call our attorney, pass him this information, so he can get it on over to the seller.
$3,000 later we have come to an agreement to split the costs. How terrific, paying into a home that is not even mine yet. Then we throw into the mix that our interest rate lock is about to expire.
How triple terrific!
The whole ordeal was an absolute nightmare.
So to answer the question, can mold on an appraisal on a conventional loan cost you a deal?
Absolutely.
Conventional loans will overlook some things, but not mold. Take it from me!
-My article also on Yahoo
I jumped for joy when I learned that indeed my good credit score helped land me a conventional loan! Yippie! I sore in the air and click my heels together.
All was gouing well. I found my dream house, everything looked peachy; that is, until a rougue heat wave came into town causing the basement to literally spore out in mold without anyone's knowledge.
The appraiser was set to come out to appraise the home, and this was when the mold spores in the basement were discovered. There was no denying this was an issue, but I figured no big deal? I have me a conventional loan, all should be well, things go easier with a conventional loan right? I have nothing to worry about right?
Wrong!
Once the underwriter got the appraisal in hand and noticed that the appraiser had suggested that the mold be tested that was when my home buying process went from easy to plopping me into the stress test treadmill.
My lender passes the information on to me. This information is then passed on to the attorney. Who then passes it on to the sellers attorney, who then passes it on to the seller.
Thankfully the seller agrees to conduct this test.
Can you guess what happens next?
They find mold! Well duh! The mold thankfully is not the toxic kind, but due to the spore count it now needs remediation!
What the heck is that?
Oh, OK. You basically want me to hire someone to rip up sheet rock and spray chemicals onto the walls. I get it, but dang, how irritating because it was something we planned on doing anyway, after we closed on the loan.
Sadly, unless it is done, there will be no loan!
Now we must once again, call our attorney, pass him this information, so he can get it on over to the seller.
$3,000 later we have come to an agreement to split the costs. How terrific, paying into a home that is not even mine yet. Then we throw into the mix that our interest rate lock is about to expire.
How triple terrific!
The whole ordeal was an absolute nightmare.
So to answer the question, can mold on an appraisal on a conventional loan cost you a deal?
Absolutely.
Conventional loans will overlook some things, but not mold. Take it from me!
-My article also on Yahoo
What Happens If My Interest Rate Lock Expries Before I Close On The House I Am Buying?
My article is also on Yahoo. Melanie Dee.
I am in the process of buying my first home. How ironic for me, I am a real estate agent who does this sort of stuff for a living. I can sling houses out in 30 days so long as my client has a standard Conventional Loan.
However due to a mold issue that my bank wanted fixed, time suddenly became my enemy. My interest rate lock and mortgage commitment expiration date was 30 days away, and the bank was not rushing anything, even though I was.
The mold issues were fixed in nearly an instant, however my bank was literally kicking stones when it came to getting their end of things finished up. I watched as my mortgage commitment letter expired, only to have to re-submit paperwork in order to get a new mortgage commitment letter.
After that expired though, the most important thing was about to expire, my interest rate lock, and this worried me. I felt as if the bank was moving slow on purpose just to slap me with a higher interest rate, and with rates hiking upward, I was really under pressure and angry.
But enough about me, you are here because you are wondering exactly what happens if your interest rate lock expires before you close on your loan.
Well many things can happen, however if it is due to the bank itself, and something out of your control you can fight them on it. For me, I had grounds to fight because the moment the bank required that the mold be tested, I hired a company to get it done in 24 hours.
The bank literally took 2 weeks doing nothing to determine if the test was OK.
In the very beginning they also wasted 2 weeks doing nothing, when finally they decided to ask for my income verification. That added up was literally a month long where they could have been working and asking me for the proper papers to be signed way ahead of time, and instead they kicked stones and didn't. They waited till the very end, and therefore I had grounds to stand on.
If you were the cause of the rate expiring, you may not have much ground to stand on, and you may have to pay a hefty fee to extend your lock by 7-15 days.
Now some lenders will issue you a free extension, but trust me when I say- before you take on any loan with a lender find out in advance what their policy is on interest rate lock expiration.
All in all, so long as it in not your fault that the loan did not close in time, and it was indeed the lenders fault, argue till the grave. Odds are they will allow an extension because they do not want to lose you as a client.
In order to avoid this mess though, always ask prior what the interest rate expiration policy is. If you do not like what you hear, find another lender. There are plenty of them out there willing to work with you.
I am in the process of buying my first home. How ironic for me, I am a real estate agent who does this sort of stuff for a living. I can sling houses out in 30 days so long as my client has a standard Conventional Loan.
However due to a mold issue that my bank wanted fixed, time suddenly became my enemy. My interest rate lock and mortgage commitment expiration date was 30 days away, and the bank was not rushing anything, even though I was.
The mold issues were fixed in nearly an instant, however my bank was literally kicking stones when it came to getting their end of things finished up. I watched as my mortgage commitment letter expired, only to have to re-submit paperwork in order to get a new mortgage commitment letter.
After that expired though, the most important thing was about to expire, my interest rate lock, and this worried me. I felt as if the bank was moving slow on purpose just to slap me with a higher interest rate, and with rates hiking upward, I was really under pressure and angry.
But enough about me, you are here because you are wondering exactly what happens if your interest rate lock expires before you close on your loan.
Well many things can happen, however if it is due to the bank itself, and something out of your control you can fight them on it. For me, I had grounds to fight because the moment the bank required that the mold be tested, I hired a company to get it done in 24 hours.
The bank literally took 2 weeks doing nothing to determine if the test was OK.
In the very beginning they also wasted 2 weeks doing nothing, when finally they decided to ask for my income verification. That added up was literally a month long where they could have been working and asking me for the proper papers to be signed way ahead of time, and instead they kicked stones and didn't. They waited till the very end, and therefore I had grounds to stand on.
If you were the cause of the rate expiring, you may not have much ground to stand on, and you may have to pay a hefty fee to extend your lock by 7-15 days.
Now some lenders will issue you a free extension, but trust me when I say- before you take on any loan with a lender find out in advance what their policy is on interest rate lock expiration.
All in all, so long as it in not your fault that the loan did not close in time, and it was indeed the lenders fault, argue till the grave. Odds are they will allow an extension because they do not want to lose you as a client.
In order to avoid this mess though, always ask prior what the interest rate expiration policy is. If you do not like what you hear, find another lender. There are plenty of them out there willing to work with you.
What Happens If My Mortgage Commitment Expires Before I Close On The House I am Buying?
I wrote this piece on Yahoo awhile back, during my home purchasing process, and I am sure a ton of folks out there have been asking the same question, so I decided to get this one out there and share it with my blogger audience as well... here is one huge question that came up during our process.
Read and find out:
What Happens If My Mortgage Commitment Expires Before I Close On The House I am Buying?!
Buying a home for the first time is supposed to be one of the happiest times of ones life. However there are tons of pitfalls and nightmares that can occur during the long ordeal that literally turns this exciting time into one so stressful that you end up loosing sleep at night.
I am a real estate agent, buying my first house. I have sold homes extremely quickly, with clients in the same position I am now in. Only there was one ironic difference.
Instead of an easy 30 day turn around, contracts, closing, and keys, my experience was nothing but a nightmare.
During my appraisal, the appraiser noted mold in the basement. Who knew this little word could end up costing me so much money, time and stress!? Well now I know. I learn something new in this industry everyday now.
The lender of course took note of this mark the appraiser so quickly made, and required a clearance. This meant they wanted the mold tested, they wanted it remediation, and $3,5000 later they were satisfied.
Only one small problem.
Even though the work was done and complete in just 4 days total, it took the bank 2 weeks to say that it was OK. Time wasted as far as I was concerned. Why it took 2 weeks to just OK the work was beyoind me. More so considering the fact that this was a conventional loan, and not some FHA 203K loan.
After that hurdle, the survey that the owner had on hand was certified only to him, so naturally the lender decided it was not good, and they wanted a new one.
Great.
They tell me this literally 60 days into the process. Never will I in my career ever in my life recommend to any of my clients to use big banks to process their loan. I have ever experienced such slow underwriting, and such a gross lack of communication.
My mortgage commitment letter and interest rate are due to expire in just days now.
Great! How on earth can I make this deadline, considering the lack of time they gave me?
I pay a surveyor $800 now, to draw up the survey and have it back to me 3 days later. I am able to do this, but once the survey is given to the bank, it takes them days to review it.
Can you guess what happened?
Naturally my mortgage commitment letter expired, along with my interest rate lock.
So what happens now!?
After my mortgage commitment letter expired, I was back to sweating again. I was worried that after all of this, and money out of my pocket that the bank would decide to randomly not issue me a new letter.
Thankfully they did, but what it took was new pay stubs, new income verification letters, a new run of my credit report for any changes, and of course 2 more weeks for the morons to process this information.
Basically, when your mortgage commitment letter expires, it is rather easy to get a new one. However it will add more time to you actually meeting a closing date. It is frustrating, tedious, and annoying. It also steals away the excitement of being a home owner. Just bear with it though, the day you move in will grow closer.
Is there a way to avoid this sort of mess?
You bet. Avoid big banks. Like the plague.
Read and find out:
What Happens If My Mortgage Commitment Expires Before I Close On The House I am Buying?!
Buying a home for the first time is supposed to be one of the happiest times of ones life. However there are tons of pitfalls and nightmares that can occur during the long ordeal that literally turns this exciting time into one so stressful that you end up loosing sleep at night.
I am a real estate agent, buying my first house. I have sold homes extremely quickly, with clients in the same position I am now in. Only there was one ironic difference.
Instead of an easy 30 day turn around, contracts, closing, and keys, my experience was nothing but a nightmare.
During my appraisal, the appraiser noted mold in the basement. Who knew this little word could end up costing me so much money, time and stress!? Well now I know. I learn something new in this industry everyday now.
The lender of course took note of this mark the appraiser so quickly made, and required a clearance. This meant they wanted the mold tested, they wanted it remediation, and $3,5000 later they were satisfied.
Only one small problem.
Even though the work was done and complete in just 4 days total, it took the bank 2 weeks to say that it was OK. Time wasted as far as I was concerned. Why it took 2 weeks to just OK the work was beyoind me. More so considering the fact that this was a conventional loan, and not some FHA 203K loan.
After that hurdle, the survey that the owner had on hand was certified only to him, so naturally the lender decided it was not good, and they wanted a new one.
Great.
They tell me this literally 60 days into the process. Never will I in my career ever in my life recommend to any of my clients to use big banks to process their loan. I have ever experienced such slow underwriting, and such a gross lack of communication.
My mortgage commitment letter and interest rate are due to expire in just days now.
Great! How on earth can I make this deadline, considering the lack of time they gave me?
I pay a surveyor $800 now, to draw up the survey and have it back to me 3 days later. I am able to do this, but once the survey is given to the bank, it takes them days to review it.
Can you guess what happened?
Naturally my mortgage commitment letter expired, along with my interest rate lock.
So what happens now!?
After my mortgage commitment letter expired, I was back to sweating again. I was worried that after all of this, and money out of my pocket that the bank would decide to randomly not issue me a new letter.
Thankfully they did, but what it took was new pay stubs, new income verification letters, a new run of my credit report for any changes, and of course 2 more weeks for the morons to process this information.
Basically, when your mortgage commitment letter expires, it is rather easy to get a new one. However it will add more time to you actually meeting a closing date. It is frustrating, tedious, and annoying. It also steals away the excitement of being a home owner. Just bear with it though, the day you move in will grow closer.
Is there a way to avoid this sort of mess?
You bet. Avoid big banks. Like the plague.
Subscribe to:
Posts (Atom)